Darn!, I want to install ubuntu, but, unfortunately I have not an internet connection..:(
Is that you question?!..
Err!, Worry not..here's a simple solution to your question..And all that you require is a "genuine friend" who has a system with Ubuntu + packages installed on it..
Use a computer where they have installed basic utility packages or where they have updated ubuntu. The packages will be in the folder “/var/cache/apt/archives”. Copy it to a removable disc or write them on to a CD/DVD (which ever makes you happy(!))”
Assume that the media name is Pen_Drive
Now, give this command in the terminal of that system which is updated(i.e from the place where you intend to copy the packages.
sudo cp -R /var/cache/apt/archives /media/Pen_Drive
Once the copy process is complete.
Unmount the removable device..and then insert this device in you computer..
and follow it up with these commands on the terminal:
cd /media/Pen_Drive/archives sudo cp -R * /var/cache/apt/archives
Now, if you want to install all the packages that is on your removeable device, then, type this command:
sudo dpkg -i *
However, if you want to install just selected packages, give this command:
sudo apt-get update
Then, go to Synaptic Package Manager and install the packages you want.
Update UBUNTU 8.04 without internet! (!)
Sticky Note as your homepage

Sticky Screen is a simple Post-It note that you can set it as your browser homepage.
ORacle ERRor ORA-27101
This post is for the oracle users....
ORA-27101 : shared memory realm does not exist
Rescue a "crashed linux" without re-installing...
"Whilst attempting to boot Fedora from the NTLoader, I recieve the following "message': "GRUB _" (The underscore represents a blinking cursor thing)...
Is that you QUESTION?!!
If Yes,
Then with the grub cursor flashing it sounds like the system can't find grub you might want to do a reload of Fedora .. But DONT DO THAT!, Fixing is is much easier than what meets the eye..:)
You could actually try duel booting using XP boot manager (My Preference. I don't like third party boot managers.)
Run the command
dd if=/dev/hda5 of=boot.lnx bs=512 count=1
If hda5 is Not your boot partition, change it as appropriate. Type: df then determine which hda# is associated with your /boot partition. A file named boot.lnx should now have been created in the root's home directory or where ever you told it to be. Do an ls -l boot.lnx to confirm this.
Mount your pendrive drive use the command mcopy boot.lnx J: Or if your internet is up and running email it to yourself.
Now reboot and go to Windows XP.
J: Copy boot.lnx C:\ (It will land it in C:\ root.)
Double click your boot.ini file and add one line at the end it should read c:\boot.lnx="Fedora 7".
Then save it.
When you reboot your XP boot manager will come up when you chose Fedora it jumps to the Grub Boot manager on your second drive.
Reboot to Fedora and Enjoy!
Mac OS X Dashboard style on Ubuntu 8.04
KDE 4, Windows, and Mac OS all have some sort of desktop widgets. Your Ubuntu desktop can also, using Screenlets. This post will guide you through installing and using Screenlets on Ubuntu 7.10 and 8.04.
Compiz’s Widget Layer plugin can be used with Screenlets to achieve an effect similar to the dashboard in Mac OS X. Your Screenlets will only be visible by activating a view that dims the desktop and displays the Screenlets on top of everything else.
In the Appearance Preferences dialog (System->Preferences->Appearance), open the Visual Effects tab and switch to the Custom effects level. If this option is not available, you need to install CompizConfig Settings Manager (CCSM) first:
sudo apt-get install compizconfig-settings-manager
Now, open CCSM by clicking the Preferences button. Find the Widget Layer plugin and select the box to turn it on.
For all the Screenlets you want on the Widget Layer, open their right-click menus and select Window->Widget. The Screenlet will disappear from your desktop. Press the default Widget Layer key, F9, to dim the desktop and display your widgets.
Installation
Installing Screenlets
You can keep up-to-date with the latest version of Screenlets by installing it through the repository.
Open your sources.list file to add the repository:
sudo gedit /etc/apt/sources.list
Add this line to the end of the file (for Ubuntu 7.10):
deb http://ppa.launchpad.net/gilir/ubuntu gutsy main universe
Add this line to the end of the file (for Ubuntu 8.04):
deb http://ppa.launchpad.net/gilir/ubuntu hardy main universe
Save and close the text editor. Run this command to update apt:
sudo apt-get update
Install the Screenlets package:
sudo apt-get install screenlets
The package python-feedparser may also be required if it is not already installed:
sudo apt-get install python-feedparser
If starting the Screenlets Manager nags you that Gtkmozembed needs to be installed, some Screenlets may not work. Run this command to fix it:
sudo apt-get install python-gnome2-extras
How to take a System backup in Ubuntu!?

It’s a good idea to ensure that you have a backup and restore system in place. Today we’ll see how in a few very easy steps you can setup system backup and restore in Ubuntu. The good part is that there’s no rocket science involved.
In order to achieve this we are going to need software called SBackup. This is not installed by default in Ubuntu and hence we need to install it. First, let’s see a little bit about this wonderful software.
Homepage: http://sbackup.wiki.sourceforge.net/
Description: SBackup is a simple backup solution for Linux. It is generally developed with a Gnome desktop in mind, but will also work in other desktop environments and also on the console.
Features of SBackup
- Back up using GUI and hence avoid the terminal.
- Restore using the GUI in simple steps.
- You can easily setup automatic backup.
- Custom choose the files to backup.
- Exclude and include files using regular expressions.
- Backup files depending on size and extension.
- You can also use terminal to backup and restore.
Limitations of SBackup
As of now you can only backup data to local or remote machine. Backing up to DVD or CD is not available as of now. However, it’s not difficult to burn a backup to disk yourself manually.
Install SBackup
Install SBackup from the package sbackup (click the link to install), or by running the command below in your terminal:sudo apt-get install sbackup
Launching SBackup
In order to launch SBackup go to System->Administration->Simple Backup Config.
Configuring and setting up backups using SBackup
Once you launch SBackup it’ll open a configuration window for you to configure backup and restore.
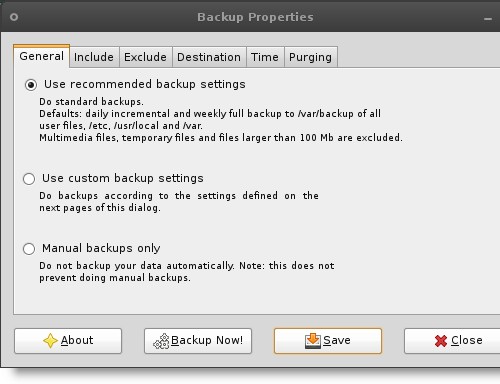
If you notice, there are three options available for setting up the backup and they are self explanatory. I’d suggest Use recommended backup settings for most users.
However, you can also select Use Custom backup Settings and setup your backups based on various criteria like file size, file extension, etc. You can also add and remove folders from the ones which you want to backup and the ones you don’t. All this can be achieved by navigating to the Include and Exclude tabs and changing settings as per your requirements.
You can also change the destination where SBackup will backup your stuff. This can be achieved by going to Destination tab.
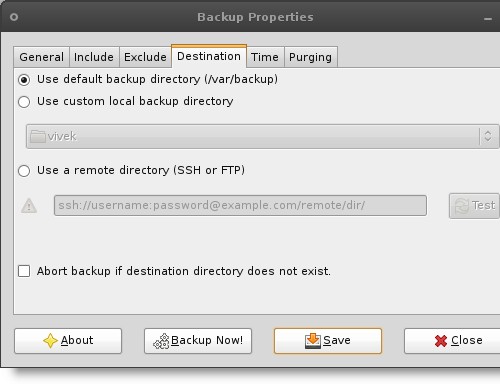
By default SBackup backs up your files to your local machine in /var/backup. You can custom choose the location and backup stuff to another machine using FTP or SSH.
Once you have selected the mode of backup, all you have to do is click Backup Now!. You should see a confirmation dialog.
Scheduling Backup
Scheduling backup is as easy as it can get. Just go to the Time tab and setup when you want to backup.
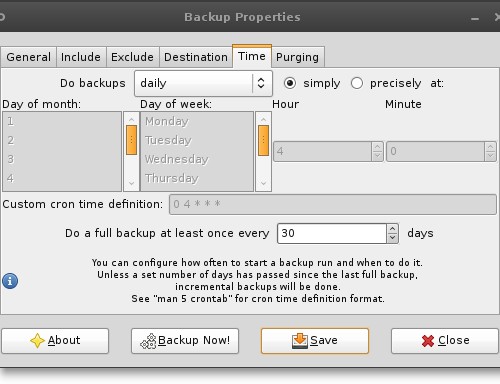
Purging old backups to avoid replication and excessive disk usage can also be setup using the Purge Tab. As I said, in most cases the Use recommended backup settings option is the best.
Restoring the data using SBackup
You can easily restore data from your backup using SBackup restore. You can do a directory-wide restore or just restore the files. To restore the data you’ll have to start the SBackup restore manager, go to System->Administration->Simple Backup restore.
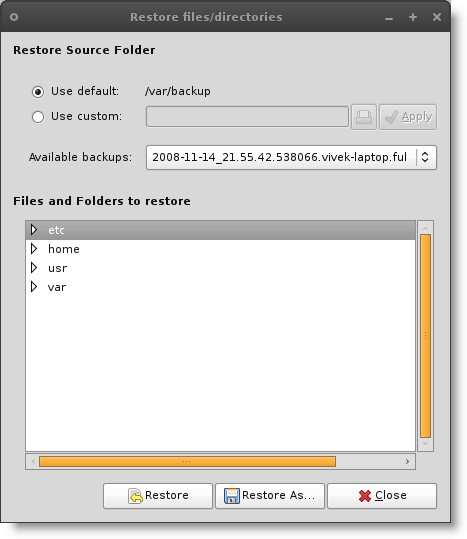
- Click on Available backups.
- Choose the backup from which you want to restore files or directories.
- Select the specific file or directory.
- Click Restore.
You’ll be prompted if you are sure, click Yes and your files/directories will be restored.
I hope this guide will make backing up and restoring on Ubuntu a cake walk.
If you want more tutorials and technology articles like this one, you can subscribe to the TNerd RSS Feed.
SOURCE : TNerd.com
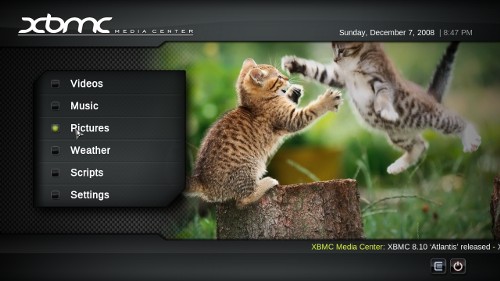
XBMC- Media beyond the ultimatum!
XBMC, recursive acronym for “XBMC Media Center“, is an award winning free and open source software media-player and entertainment hub for all your digital media.
Multi-platform, Internationalized, and Localized
XBMC is a cross-platform software available for Linux, Mac OS X (Leopard, Tiger, and Apple TV), Microsoft Windows operating-system, as well as the original Xbox game-console. With translations to over 30 languages for a worldwide audience. All versions of course completely free of any adware or spyware.
- XBMC for Linux
- XBMC for Mac
- XBMC for Windows
- XBMC for Xbox
- XBMC Live
Community
Over 50 developers have contributed to XBMC, and over 100 translators have worked to expand its reach. XBMC was created by created by a group of like minded back in 2003. XBMC Community Forum today have over 30,000 registered members, nad XBMC had already an estimated userbase of over one million daily end-users when it was only running on the the Xbox platform, and now that XBMC runs nativly on several other platforms as well we estimate that that the userbase have growed exponentionally.
User-friendliness that is Next To Godliness
XBMC is easy to install and setup, and its many beautiful custom user interfaces offers simple very intuitive navigation which are very convenient and flexible, adding to great price verses performance ratio when installed on cheap hardware to this best in class software. With and experience surpases all retail media center systems.
Superb Format and Codec support
XBMC supports a very complete spectrum of of audio and video multimedia file formats and codecs right out-of-the-box, and include features such as playlist playback, audio visualizations, picture viewing, slideshows, and weather forecast functions, RSS feed scroller on your home screen, together with a ever expanding array of community driven third-party add-ons and plugins.
Endless playback capabilities for All Types of Media
XBMC can play most audio and video file formats as well as display images at resolutions up to 1080p and over from virtually any source, including your local harddrive, CD/DVDs, USB flash drives, the Internet, and network shares, upscaling any lower resolutions videos to the maximum of your displays capability. XBMC can also playback DVD-Video movies with menus from ISO/IMG-images on-the-fly, even when they are in an RAR or ZIP archive. For music playback XBMC offers gapless playback, crossfading, cue sheet, replay gain amplification, advanced smart playlists, and chapter support.
XBMC can download or stream Internet video and audio streams, and play Internet radio stations (such as Podcasts and SHOUTcast), and listen to your favorites and discover new music with free, streaming music from Last.fm, among others.
XBMC of course handles all common digital picture formats with the options of panning/zooming, and slideshow with “Ken Burns Effect“. XBMC also handles CBZ and CBR comic book archive files, this feature lets you view/read, browse and zoom the pictures of comics pages these contain without uncompressing them first.
Online Powered Media Management
XBMC has a database driven video and music library view modes which help organize and filter all of your media straight out-of-the-box in. The video library allow you to easily browse your video content by things like; genre, title, year, actors, and directors, as well as carry our extensive searches on casts and related information. Similarly, XBMC’s music library allows the organization of your music collection by information stored in your music file ID meta tags, like title, artist, album, genre and popularity, as well as having access to powerful search and Smart Playlists features, helping you find exactly what you want in a fast and simple way.
Album and Cover Art
XBMC takes full advantage of broadband Internet connection if available, Artwork is automatically fetched for posters, artwork, fanart, synopsis and reviews on movies, plot, cast and episode information for TV shows, also album covers and artist information for music.
Extendable and Flexible Add-ons
XBMC features a Python Scripts Engine and WindowXML application framework (a XML-based widget toolkit for creating a GUI for widgets) in a similar fashion to Apple Mac OS X Dashboard Widgets and Microsoft Gadgets in Windows Sidebar. Python widget scripts allow normal users to add-on ‘extensions’ with new functionality to XBMC themselves, using the easy to learn Python scripting language, without the need for knowledge of any complex programming languages or the inner workings of XBMC. Current plugins and scripts include a multitude of added functions like Internet TV and radio streams, podcasts, movie-trailer browsers, and cinema guides, e-mail clients, instant messaging, train-timetables, peer-to-peer file-sharing downloaders, IRC, also casual games (sometimes also referred to as mini-games or party-games) such as Tetris, Snake, Space Invaders, Sudoku, and much more.
Fully Skinnable and Customizable Interface
XBMC is noted and highly regarded as having a very flexible GUI toolkit and robust framework for its GUI, (now also proven by the fact that several other software projects have copied it). Users can create their own skins, or choose one of the many already available skins. XBMC uses a standard XML base, making theme-skinning and personal customization very accessible to everyone. Users themselves can create their own skin (or simply modify an existing skin) and share it with others via public websites dedicated for XBMC skins trading. Colors, controls, navigation, positioning of elements, animation, even adding additional functionality can be achieved with a skin. “Project Mayhem” is the official skin from Team-XBMC; which is now in its third version, commonly know as “PM3″. Many third-party skins exist and while many are of original and unique designs, a few skins are almost exact replicas of other multimedia software, with skins clones of Apple TV and Front Row, Microsoft Windows Media Center Edition (MCE), MediaPortal, Meedio/MeediOS, HDeeTV, Kaleidescape, Xbox 360, PlayStation 3, and others. Each skin provides a totally different and unique user experience, all showing just how flexible XBMC’s skinning engine really is.
FOSS (Free Open Source Software)
XBMC Media Center software is distributed as open source under the GNU General Public License, (with a few sub-libraries licensed under the LGPL), and as a non-profit project XBMC is run and developed by volunteers in their spare-time without any monetary gain. Team-XBMC encourage anyone to contribute to the project, submit their own source code patches for new features and functions, improve existing ones, or fix any bugs in XBMC that you might find.
Technical Summary
XBMC is written in the C++ program language (and some Assembly code), XBMC uses the SDL (Simple DirectMedia Layer) multimedia framework and OpenGL for graphics rendering the Linux, Mac OS X, and Microsoft Windows based operating-system platforms, and the Xbox version of XBMC uses Microsoft DirectX multimedia framework and Direct3D for graphics rendering, (as the Xbox does not support OpenGL).
Installation
Open System->Administration->Software Sources and select the Third Party Software tab. Add the following software source:deb http://ppa.launchpad.net/team-xbmc-intrepid/ubuntu intrepid main
Close Software Sources and when prompted, choose to reload the repositories.
Install XBMC from the package xbmc (click the link to install), or by running the command below in your terminal:sudo apt-get install xbmc
Optionally you can also install:
- additional skins
sudo apt-get install xbmc-skin-* - support for remote controls
sudo apt-get install xbmc-eventclients-* - a scripting example
sudo apt-get install xbmc-scripts-example
Starting and Running XBMC
All that is left now is to start XBMC. You can start XMBC by going to Applications->Sounds & Video->XBMC Media Center.
Compiz Earth
Compiz 0.7.6 comes with new plugins that allow you do quite a lot. The best of the lot is getting the earth out of your desktop.
Check the video below--
"Awesome!" would perhaps be just an euphemism!
Click here to view the video
To install Compiz 0.7.6 just add the following repository
deb http://ppa.launchpad.net/compiz/ubuntu hardy main
The Worlds First SuperComputer PC
The world's first personal supercomputer, which is 250 times faster than the average PC, has been unveiled on dec 6 2008 . With its £4,000- £8,000 price tag, the Tesla supercomputer is beyond the reach of most consumers, but is expected to revolutionise the way scientists and medical professionals carry out their work.
Until now, supercomputers were massive systems made up of thousands of machines taking up entire rooms, which cost millions of pounds to build and maintain.By contrast, Tesla personal supercomputers will cost between £4,000 and £8,000 and look much like an ordinary PC
David Kirk, chief scientist at NVIDIA, the American company which has designed the new technology, said: "Pretty much anything that you do on your PC that takes a lot of time can be accelerated with this.""These supercomputers can improve the time it takes to process information by 1,000 times."
The new computers make innovative use of graphics processing units - a technological breakthrough, which the company claims could bring lightning speeds to the next generation of home computers.They went on sale to British customers yesterday and will initially be sold to universities and to the scientific and research community.
The PC maker Dell, however, said that it would soon be mass producing them for the general consumer market.
Mount ISO images without burning..:)
Some times you want to use iSO images without burning them.If you don’t want to waste your CD’s/DVD’s here is the simple possible solutions using these tips you can mount and unmount ISO images without burning them.
I know two possible solutions
1) Using Nautilus Scripts
2) Using kernel loop module
Now we will see each one in detailed
Using Nautilus Scripts
I am taking this tip from http://ubuntuforums.org/showthread.php?t=87369&page=3 first you need to download two scripts for mount iso images download from www.debianadmin.com/images/iso/mount.sh and to unmount iso images download from www.debianadmin.com/images/iso/mount.sh
Once you have these two scripts you need to change the permissions using the following commands
sudo chmod +x /home/username/mount.sh
sudo chmod +x /home/username/unmount.sh
Now you need to copy them nautilus scripts
sudo mv /home/username/mount.sh ~/.gnome2/nautilus-scripts/
sudo mv /home/username/unmount.sh ~/.gnome2/nautilus-scripts/
That’s it now you are ready for mounting and unmounting your ISO images.
Animate your Ubuntu!
Have some spare CPU cycles to burn? Using a utility called XWinWrap you can use screensavers, videos, and other applications as your desktop wallpaper.
One drawback is that you will not be able to use desktop icons with XWinWrap due to a limitation in Nautilus. Compiz desktop effects are not required, but a fairly powerful computer if you don’t want reduced performance.
Install XWinWrap
XWinWrap is not available in the Ubuntu repositories, but an easily installable DEB package is available. Download and extract the zip archive, and then install the DEB package from the i386 or x86_64 folder depending on your CPU type.
XWinWrap only works properly for me once I’ve disabled desktop icons. Do so with the following command:gconftool-2 -s '/apps/nautilus/preferences/show_desktop' --type bool false
Run this if you want to undo and enable desktop icons again:gconftool-2 -s '/apps/nautilus/preferences/show_desktop' --type bool true
Using XWinWrap
Now you’re ready to run XWinWrap commands to create an animated wallpaper effect. You can start XWinWrap from a terminal or from the Run Application dialog (F2). To exit XWinWrap from the terminal, just press Ctrl-C. To exit XWinWrap when it’s started from the Run Application dialog, run the command below:killall xwinwrap
While trying out different effects, remember to exit XWinWrap before starting it again.
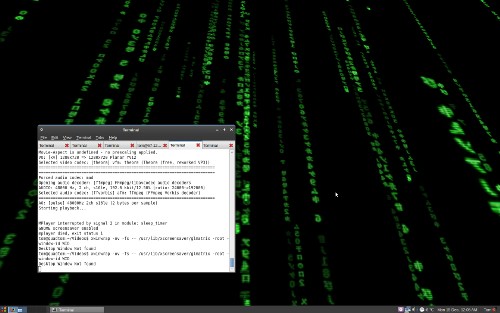
Animated Wallpaper - Screensavers
This command will start the glmatrix Matrix screensaver as your wallpaper:xwinwrap -ov -fs -- /usr/lib/xscreensaver/glmatrix -root -window-id WID
Here a few other screensavers you can run as wallpaper for a neat effect:
- Tunnel:
xwinwrap -ov -fs -- /usr/lib/xscreensaver/atunnel -window-id WID - Toasters:
xwinwrap -ov -fs -- /usr/lib/xscreensaver/flyingtoasters -window-id WID - Plasma (slow speed):
xwinwrap -ov -fs -- /usr/lib/xscreensaver/plasma -window-id WID -x 30 -s 1
Animated Wallpaper - Video
Using the MPlayer video player, you can use any video with XWinWrap.
Install MPlayer from the package mplayer (click the link to install), or by running the command below in your terminal:sudo apt-get install mplayer
This XWinWrap command will loop play the video file video.ogg:xwinwrap -ov -fs -- mplayer -wid WID -quiet -loop 0 video.ogg
Once you’ve found an effect you like, you can add the command to the startup programs in System->Preferences->Sessions to load it when you log in.
GOOGLE SMS!!
As humans, we have many questions running in our mind! Every new minute poses a new problem and the quest to find the solution to the problem. In a bid to take off most of the burden of problems from our mind and provide answers to our questions Google has launched the newer version of Google SMS search! The new version comes with new numbers and loads of features added to it. To use this users just need to SMS their query to 9773300000 which will cost them just the regular charge of a regular SMS, and they will get answers instantly. So, if you are late at night without a ride home and you don’t know what to do? Need a number of a taxi service? Just SMS you query to 9773300000 from any GSM or CDMA mobile phone! “Run out of cash in a new city and looking for an ATM? Power cut in between a nail biting cricket match. Need instant updates on the score? Long queues at the railway enquiry counter making you sweat? Wondering how many woollens to pack for your Delhi trip? Another collapse on BSE, want an update on your stock? Can’t understand the word your girlfriend just used?” Yes, Google has all the answers for queries like these as well now. Here is how users can use this service – To receive instant Cricket Scoressimply type in “cri” or “cricket” or “cricket India” as an SMS to the aforementioned number. For PNR enquiries in Indian Railways, send the PNR number to know the confirmed/RAC/current waitlist status. Stock Quotes from BSE can be received by text messaging “Company name quote”, for example “reliance stock”. To know your horoscope just send your sunsign e.g. “Virgo” for the day’s horoscope. Local search on categories like “Restaurants Indira Nagar Bangalore” and businesses like “Pizza Hut Koramangala”, etc, too can be made across 34 cities which include Ahmedabad, Bangalore, Kolkatta, Chennai, Delhi, Mumbai, Hyderabad, Pune, Noida, Gurgaon, Faridabad, Vadodara, Surat, Kanpur, Jaipur, Chandigarh, Nagpur, Rajkot, Ernakulam, Cochin, Gaziabad, Bhuwneshwar, Aurangabad, Lucknow, Nashik, Indore, Panaji, Bhopal, Agra, Guntur, Visakhapatnam, Jalandhar, Amritsar, Coimbatore. Get a dose of daily news by text messaging “news” and “business news” for current happenings in the business world. If you think its time for 72 mm entertainment, just type in “movies city” e.g. “Golmaal Returns Delhi” for movie showtimes; you can also get movie ratings with this new feature. Filght status for Jet, Kingfisher, Indigo & Spicejet can be known by simply sending “9w502″, “It 302″. Definitions can be retrieved from the net by sending “define Similarly Weather updates are available on sending “weather city” e.g. “weather Mumbai”. Also calculations, currency conversions and facts are available by the service – for e.g. “1 kilo in pound”, “5000 INR in USD”, “GDP of India” or “population of Bangalore”.
Crack the .zip passwords using ubuntu!
If you want to crack zip file passwords use fcrackzip.fcrackzip is a fast password cracker partly written in assembler. It is able to crack password protected zip files with brute force or dictionary based attacks, optionally testing with unzip its results.
Install fcrackzip in Ubuntu
sudo aptitude install fcrackzip
This will complete the installation.
Fcrack Syntax
fcrackzip [-bDBchVvplum2] [--brute-force] [--dictionary] [--benchmark] [--charset characterset] [--help] [--validate] [--verbose] [--init-password string/path] [--length min-max] [--use-unzip] [--method name] [--modulo r/m] file.
fcrack Options
-h, –help
Prints the version number and (hopefully) some helpful insights.
-v, –verbose
Each -v makes the program more verbose.
-b, –brute-force
Select brute force mode. This tries all possible combinations of the letters you specify.
-D, –dictionary
Select dictionary mode. In this mode, fcrackzip will read passwords from a file, which must contain one password per line and should be alphabetically sorted (e.g. using (1)).
-c, –charset characterset-specification
Select the characters to use in brute-force cracking. Must be one of
a include all lowercase characters [a-z]
A include all uppercase characters [A-Z]
1 include the digits [0-9]
! include [!:$%&/()=?[]+*~#]
: the following characters upto the end of the spe-
cification string are included in the character set.
This way you can include any character except binary
null (at least under unix).
For example, a1:$% selects lowercase characters, digits and the dollar and percent signs.
-p, –init-password string
Set initial (starting) password for brute-force searching to string, or use the file with the name string to supply passwords for dictionary searching.
-l, –length min[-max]
Use an initial password of length min, and check all passwords upto passwords of length max (including). You can omit the max parameter.
-u, –use-unzip
Try to decompress the first file by calling unzip with the guessed password. This weeds out false positives when not enough files have been given.
-m, –method name
Use method number “name” instead of the default cracking method. The switch –help will print a list of available methods. Use –benchmark to see which method does perform best on your machine. The name can also be the number of the method to use.
-2, –modulo r/m
Calculate only r/m of the password. Not yet supported.
-B, –benchmark
Make a small benchmark, the output is nearly meaningless.
-V, –validate
Make some basic checks wether the cracker works.
fcrackzip Examples
fcrackzip -c a -p aaaaaa sample.zip
checks the encrypted files in sample.zip for all lowercase 6 character passwords (aaaaaa … abaaba … ghfgrg … zzzzzz).
fcrackzip --method cpmask --charset A --init AAAA test.ppm
checks the obscured image test.ppm for all four character passwords. -TP fcrackzip -D -p passwords.txt sample.zip check for every password listed in the file passwords.txt.
Animate you Ubuntu!
Have some spare CPU cycles to burn? Using a utility called XWinWrap you can use screensavers, videos, and other applications as your desktop wallpaper.
One drawback is that you will not be able to use desktop icons with XWinWrap due to a limitation in Nautilus. Compiz desktop effects are not required, but a fairly powerful computer if you don’t want reduced performance.
Install XWinWrap
XWinWrap is not available in the Ubuntu repositories, but an easily installable DEB package is available. Download and extract the zip archive, and then install the DEB package from the i386 or x86_64 folder depending on your CPU type.
XWinWrap only works properly for me once I’ve disabled desktop icons. Do so with the following command:gconftool-2 -s '/apps/nautilus/preferences/show_desktop' --type bool false
Run this if you want to undo and enable desktop icons again:gconftool-2 -s '/apps/nautilus/preferences/show_desktop' --type bool true
Using XWinWrap
Now you’re ready to run XWinWrap commands to create an animated wallpaper effect. You can start XWinWrap from a terminal or from the Run Application dialog (F2). To exit XWinWrap from the terminal, just press Ctrl-C. To exit XWinWrap when it’s started from the Run Application dialog, run the command below:killall xwinwrap
While trying out different effects, remember to exit XWinWrap before starting it again.
Animated Wallpaper - Screensavers
This command will start the glmatrix Matrix screensaver as your wallpaper:xwinwrap -ov -fs -- /usr/lib/xscreensaver/glmatrix -root -window-id WID
Here a few other screensavers you can run as wallpaper for a neat effect:
- Tunnel:
xwinwrap -ov -fs -- /usr/lib/xscreensaver/atunnel -window-id WID - Toasters:
xwinwrap -ov -fs -- /usr/lib/xscreensaver/flyingtoasters -window-id WID - Plasma (slow speed):
xwinwrap -ov -fs -- /usr/lib/xscreensaver/plasma -window-id WID -x 30 -s 1
Animated Wallpaper - Video
Using the MPlayer video player, you can use any video with XWinWrap.
Install MPlayer from the package mplayer (click the link to install), or by running the command below in your terminal:sudo apt-get install mplayer
This XWinWrap command will loop play the video file video.ogg:xwinwrap -ov -fs -- mplayer -wid WID -quiet -loop 0 video.ogg
Once you’ve found an effect you like, you can add the command to the startup programs in System->Preferences->Sessions to load it when you log in.
Intrepid Ibex- The Views and their Re-Views!
One of the first things you would notice after booting into Ubuntu 8.10 Desktop , is the new improved Human theme which has got a tinge of Orange. Status bar,Buttons glow and few icons have been changed and made more friendly looking. Ubuntu 8.10 also includes a brand new theme "Dark Room".
 with "Dark Room" theme applied
However , with "Dark Room" theme I noticed I was unable to read text in Menu Bar sometimes.
 Improved Shutdown dialog box
Ubuntu 8.10 includes the latest stable version of Gnome - Gnome 2.24 . Gnome 2.24 is an extremely polished desktop environment and includes a host of feature addition. Nautilus the default File Manager in Gnome , now supports like Mozilla Firefox , Tab Browsing allowing you to browse number of different directory location inside a single nautilus window in separate tabs. Also Nautilus now supports encrypted private directory.
Furthermore , Ubuntu 8.10 includes improved Network Management tool allowing you to easily configure your DSL , Wireless , Wired , VPN etc networks.
 Multiple tabs in Nautilus, also note new eject icons infront of mountable drives and encrypted folders

Ubuntu 8.10 supports "Guest Login" allowing anyone to log into Ubuntu machine without having an account ,however only catch is Guest users will not get access to any file of other users or be able to create files for security reason. This is especially useful where a single computer is used by a number of users , and you dont want others to peek into your files.
Hardware support has definitely improved with version of Ubuntu 8.10 , everything from Network Card , Bluetooth to Sound Card worked out of box on my cranky old Lenovo y410 laptop, In fact prior to version 8.10 I had hell lot of trouble configuring my sound card properly and even then headphone jack never worked properly. Inclusion of Alsa-1.0.17 in Ubuntu has definitely improved audio hardware support.Also there is improved support for NVidia graphics chipset/card. Proprietary drives can be easily downloaded and installed onto the system from (System -> Administration -> Hard Ware Drivers ). One reason why HardWare support is better in Ubuntu 8.10 is Ubuntu 8.10 is based on Linux kernel 2.6.27 which has significantly better hardware support.
Also , I am not sure whether it's me only or other people have also noticed that Intrepid Ibex runs a lot faster compared to earlier version of Ubuntu - "Hardy Heron" everything opens in a jiffy.
On the Software side , File-Roller now supports ALZ, RZIP, CAB, TAR.7Z file types , Ubuntu 8.10 includes updated version of X.Org - X.Org 7.4 which includes new much helpful failsafe X to diagnose cases where X Server fails to start. Ubuntu 8.10 also includes updated Samba 3.2 for browsing Windows Share on a network.
However , Ubuntu 8.10 includes older version of Open Office even though Stable 3.0 Version of Open Office is out. Though it will not be difficult for someone to update Open Office from repositories on a new Ubuntu 8.10 system.
Conclusion : Overall Ubuntu 8.10 is a well polished desktop Linux distribution , though not radically different from earlier version 8.04 of Ubuntu. Features like Tabbed Browsing in Nautilus , Encrypted Folders , better Hardware support ,being faster etc are reason compelling enough to Upgrade to the latest offering from Ubuntu team.
Re-installing grub; After "Windows wipes out Fedora"
"I reinstalled my Windows XP and my grub was fully erased in my Windows’ MBR. I could not boot my Fedora 8 anymore." Is that your question?! This could be of big help to you. Just follow the simple instructions below. Insert your Fedora 8 installer (CD1) and set your boot sequence to your CD. When the CD is loaded, choose “Rescue installed system” from the menu. Wait for it to be loaded and follow the wizard. In the command, check first the name of your partitions, fdisk -l It says something like sda, sda1, sda2/hda, hda1, … In my system, my Windows is installed on my first partition which is the sda. Change the current directory to /mnt/systimage with a root privilege. chroot /mnt/sysimage Install grub to your MBR’s location device, which is the Windows partition /sbin/grub-install /dev/sda Perfect! Restart your system and set the boot to your hard drive. It will show you the menu listed your Windows and your Linux. If these steps will not work, repeat again because this really works.
CCleaner..
CCleaner is a freeware system optimization, privacy and cleaning tool for windows. It removes unused files from your system - allowing Windows to run faster and freeing up valuable hard disk space. It also cleans traces of your on
line activities such as your Internet history.
This was very useful to me.. since it deleted all the files with the dangling links....
These files exist in your system files, registry entries etc...
Whenever you install a software many files get created in your system folders. These files are created by the program that was installed and will be used by them, When you uninstall the program, some of these files doesn't get deleted and they remain forever in your system memory.We just cannot manually delete those files. They take up your harddisk space and sometimes they might also result in reducing the system's efficiency. Hence its always safe and good to get rid of them. This CCleaner does the same. Its a freeware with a size of about 2.82mb, just download the file and you go...
It has a simple and user firendly interface....
I have put some of the snapshots here...


In the main menu you have two options, first press on the analyze button, it will scan thru all your temporary files and list them for you. Then press Run Cleaner which cleans all the files listed....
In the registry tab... you have two options Scan Issues which scans for the issues and the second option to fix those issues....
It also has a tools tab which allows you to remove the unnecessary programs similar to your add or remove programs in the control panel....
It cleaned more than 400 Mb of space from my hardisk and my system now has faster at startup time...
use it
here is the link to download it
http://www.filehippo.com/download_ccleaner/
and enjoy...
The cons about Chrome!

MultiTasking in UNIX
Unix is a versatile system environment. If you are familiar with the shell scripting....then you should be familiar with the usage of the operator called pipe... A pipe is represented by a vertical line '|' . It is used to join two or more shell scripts... One way looking at it is when you want the output of one command to be the input of other then you pipe those two commands... Here is an illustration of the multitasking. Since there is no intermediate file cre
diagramatically it can be shown as ->
Some times the child process might produce lots of output that the output is written onto a file. This means that you will have to wait for a long tim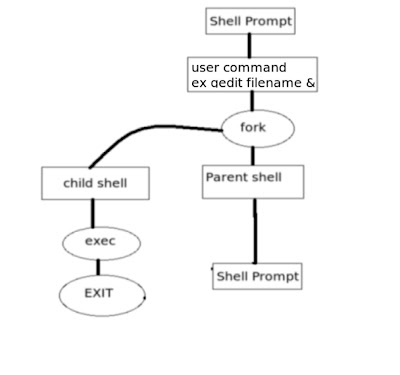
HAcking THe RoOt....
Windows password is crackable... you find many methods to hack into the windows administrator...
But linux being one of the most secure OS... i wondered how do we get access into it.. I have been trying to break thru the password in all the computers in my college labs... But i was never succesful... But this day I got the key to open the lock.. so I just wanna share it with you all.....
In this method.. we hack into the root password through the grub....
Being a linux user i assume that you know what a grub is... if you dont then.. in simple words its just a boot loader.. which appears on your screen as soon as you switch on your power button...
It has options to select the different operating Systems that has been installed on your system..
One of the sample grubs looks as shown here...

As soon as you switch on the computer you press one of the arrow keys( up or down ).. to access this grub..
In the grub options you press 'e' to enter the edit mode..
once you enter the edit mode.. you get some 3 lines of text..
select the line that starts with 'kernel'
and press 'e'..
Now you are in the edit mode..
just insert the number 1 at the end of the line....
and press 'b' to boot thru the kernel....
Now this takes you to the single user mode.... you actually get the root user rights... and you get a shell prompt.....
now you can easily change the password.... just type the passwd.. at the shell prompt...
Its asks you for the new password ... you just enter and proceed... It will ask you to enter the new password twice......
After the password is changed.. type exit to reboot the system.
And there you go.. you login into root using your new password.......and enjoy!!!
Upgrade hardy to intrepid!!
Ubuntu 8.10 is the upcoming version of the Ubuntu operating system. The common name given to this release from the time of its early development was “Intrepid Ibex”.
Note: This is still a beta release. Do not install it on production machines. The final stable version will be released in 30th October 2008.
Important Notes Before Upgrade
- Take a complete Back up all your data. There is no guarantee that all will go well.
- Remember that this software is still beta at this time. It is not for production machines.
- Be sure that you have all updates applied to Ubuntu 8.04 LTS before you upgrade
Procedure to follow
To upgrade from Ubuntu 8.04, press Alt+F2 and type in “update-manager -d” (without the quotes) into the command box.

---Update Manager should open up and tell you: New distribution release ‘8.10′ is available. Click Upgrade
---This will show you Ubuntu 8.10 Intrepid Ibex Release notes click on upgrade
---If you are using any third party sources in your /etc/apt/sources.list file it will be disabled at the time of upgrade process click close
---
Testing Your Upgrade
You can check the ubuntu version installed using the following command
sudo lsb_release -a
Output Looks like below
No LSB modules are available.
Distributor ID: Ubuntu
Description: Ubuntu intrepid(development branch)
Release: 8.10
Codename: intrepid

Speed up your Comp- The Geek Way!
Over time personal computers tend to slow down - particularly so with those running on Windows. I have heard stories of computers getting so slow that the owner just eventually gave up and bought a new computer instead.
But there are things you can do to speed up your computer.
There are a number of reasons why computers start to run slowly. Some of the most common are viruses and spyware working in the background of your computer, files scattered around your computer hard drive so your machine has to work harder to link them all together, and errors which gently build up on your hard drive.
There is a huge market of companies who make considerable profits sorting these issues out each year but instead I want to tell you about 3 free options that will help you do all of the above. I have been personally testing them for some time now and am really liking what I see so now I want to take a moment to show what I hope will be a few really helpful tips.
Antivirus
Personally I use Norton antivirus and swear by it but Norton *will* cost you some money. I pay for a multi-user license so I can have it installed on my 3 computers and have protection no matter which one I’m on.
However many people swear by AVG which is free. Personally I would only trust a tiny handful of brands as being truly useful. Plenty of people have old versions of antivirus or some other free application but its vital your antivirus is updated constantly. With new viruses being created daily, an antivirus program that doesn’t update online each time you log onto the Internet is probably failing to recognise some viruses and this can be dangerous.
Defragmenting
We download programs, delete files, uninstall software and so on. Over time this turns into a jumble of files and empty spaces on our hard drive and defragmenting hopes ot get rid of this fragmentation. This should therefore seepd up your computer.
Windows itself comes with a defragmentation application so you actually probably already have one right now. The problem is how slow it is. I have over 200,000 files on my main PC and a full defrag takes pretty much a whole night on my PC. That’s too slow for my liking.
However I recently discovered a really nifty tool called Smart Defrag that works cleverly when you’re not using your computer. So if you nip off to the loo, or watch TV, or even to check something in a book, the defrag software realises and jumps into action. As soon as you start using your computer again it goes into sleep mode.
In this way every time your computer is idle it defragments itself a little more, and as soon as you start using it, it goes into sleep mode. So you get the benefits of constant defragmenting (which means you don’t have to remember to do it!) but your PC doesn’t slow down while it’s working. What a great idea!
Registry Problems
There are loads of paid applications when it comes to sorting out registry problems but I have found a free one that works great. Called Advanced WindowsCare V2 this application will look at everything that goes on “under the hood” with your computer and then bring up a list of suggestions about what needs speeding up, improving or fixing. You select what you’d like it to do and it goes for it. I noticed a significant increase in speed personally when I used it and would strongly recommend it to you.
How to find and delete files-All at once..:)
I was trying to delete a list of files with a character '-' in their filenames from a directory, containing lots of other files. Thanks to linux, you get everything you need here.#find ./directorypath -regex '.*-.*'
lists all the files/directories containing '-' anywhere in the filename or directory name.
-regex allows to give any pattern to do powerful custom search.
To list only the files, add -type f#find ./directorypath -type f -regex '.*-.*'
To delete all the files/directories with any pattern, just add command to the above line as shown below#find ./directorypath -regex '.*-.*' -exec rm -rf {} \;-exec rm -rf {} \;
executes rm -rf (remove forcefully and recursively in case of directory). The files/directories found by find command is passed to the rm -rf command via {}, which deletes them. \; marks the end of the command.
I suggest you first move all the files to some directory, before deleting them, just incase you don't accidentally delete some important files.
Appnr - A Simpler Synaptic
I recently stumbled upon a website called www.appnr.com. Apparently, this happened to be one of the best sites that I have come across in a long time. Appnr has a reservoir of apps(1700+) exclusively for Ubuntu and provides a great way to find and install them. No more apt-gets, add/remove programs or even Synaptic Package Manager. Just click the button "install" and you're done. Leave the rest; your system will take care of it. Appnr is best suited for newbies who find it difficult to use command line or select packages. No more tears! With Appnr, software installation is just a click away. Another wonderful thing about this site is - its FREE! No registration required. You can install the applications straight from the site. With all these pros, I'm still struggling to find some cons for this site. Anyway, I do want to provide some screenshots of how things work.
1. Select a software that you want
2. Click Yes when it asks you to install
3. Downloads Relevant Packages
4. Installs Software
5. Finalizes Installation
6. Completes Installation
7. Installed Software - Works like a Charm!
As simple as that!
Command Line Package Management Utility
Most of the Linux newbies say it is difficult to install softwares on Linux. Well, they are newbies! However, when it comes to installing softwares, a migration from Windows to Linux is always expected with an installation file and some "next" buttons which must be pressed for completing the formalities. Well, everyday cannot be a sunday. You can't expect the same thing to happen in every operating system. I am one of those people who take the shorter route. There is absolutely no need to worry about downloading the relevant packages and compiling them to make a software work. Linux uses a simple command line package management utility which makes the job unusually simple! Yes. One simple command can install a software without you having to monitor the process of installation. What good is an Operating System if it banks on us for something that we want it to do? Anyway, Linux uses this command line thingy to ease our work in installing stuff! Unfortunately, the commands differ with different distributions. But of course, each distribution uses its own package management system. Lets take a look,
yum - Yellowdog Updater Modified
This is used by RedHat Linux and its children Fedora-Cores. To install a software using the yum command, simply type
# yum install (package-name)
To make the whole process automated, add -y
# yum install -y (package-name)
(Wave goodbyes to the crappy "Next" buttons). Now the installation is much more easier than before. Just give the command and the package management system will take care of the rest.
OK! How the hell am I supposed to get rid of this software? Its as simple as you installed it. Just fire the following command and let yum do the talking!! Or cleaning, rather!
# yum remove -y (package-name)
With this, all the dependencies and packages would be removed and your Linux will be a lot cleaner now.
For Ubuntu, we have no dogs! But we do have something called Aptitude. Aptitude is a text-based front-end to the APT (Advanced Packaging Tool). There is hardly any difference between aptitude and apt-get. But people do prefer using aptitude. Both share the same repositories and install softwares. But the difference comes when a software is to be removed. Both aptitude and apt-get remove the dependencies. But aptitude removes those packages that are no longer in use. apt-get fails to take care of this simple, yet important, aspect. Anyway, I would like to introduce you one of the wonders of Ubuntu,
# sudo apt-get install (package-name)
# sudo aptitude install (package-name)
As said before, its easy to uninstall a software. Use remove in the place of install and you're done!
# sudo apt-get remove (package-name)
Of course, -y is always there!!
Okay now. What about SUSE?
SUSE has the famous Yast configuration tool. Yast, which actually stands for Yet Another Setup Tool, has been graded as one of the most efficient package management systems. Like other Linux distributions, Yast is also used for maintaining packages and installations in SUSE. It has various functions like installing software, configuring hardware, setting up networks, etc. Something I like about Yast is that it has a better GUI compared to other package management utilities which makes it easier to navigate and find things. However, the command line installation is done through zypper.
# zypper install (package-name)


