
It’s a good idea to ensure that you have a backup and restore system in place. Today we’ll see how in a few very easy steps you can setup system backup and restore in Ubuntu. The good part is that there’s no rocket science involved.
In order to achieve this we are going to need software called SBackup. This is not installed by default in Ubuntu and hence we need to install it. First, let’s see a little bit about this wonderful software.
Homepage: http://sbackup.wiki.sourceforge.net/
Description: SBackup is a simple backup solution for Linux. It is generally developed with a Gnome desktop in mind, but will also work in other desktop environments and also on the console.
Features of SBackup
- Back up using GUI and hence avoid the terminal.
- Restore using the GUI in simple steps.
- You can easily setup automatic backup.
- Custom choose the files to backup.
- Exclude and include files using regular expressions.
- Backup files depending on size and extension.
- You can also use terminal to backup and restore.
Limitations of SBackup
As of now you can only backup data to local or remote machine. Backing up to DVD or CD is not available as of now. However, it’s not difficult to burn a backup to disk yourself manually.
Install SBackup
Install SBackup from the package sbackup (click the link to install), or by running the command below in your terminal:sudo apt-get install sbackup
Launching SBackup
In order to launch SBackup go to System->Administration->Simple Backup Config.
Configuring and setting up backups using SBackup
Once you launch SBackup it’ll open a configuration window for you to configure backup and restore.
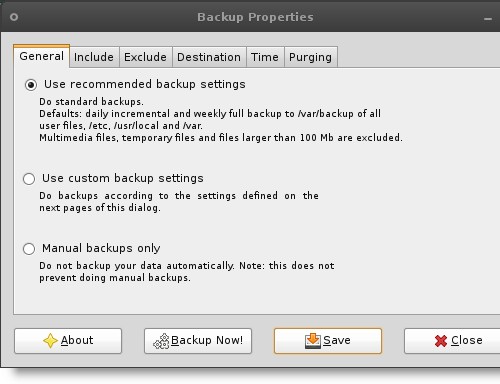
If you notice, there are three options available for setting up the backup and they are self explanatory. I’d suggest Use recommended backup settings for most users.
However, you can also select Use Custom backup Settings and setup your backups based on various criteria like file size, file extension, etc. You can also add and remove folders from the ones which you want to backup and the ones you don’t. All this can be achieved by navigating to the Include and Exclude tabs and changing settings as per your requirements.
You can also change the destination where SBackup will backup your stuff. This can be achieved by going to Destination tab.
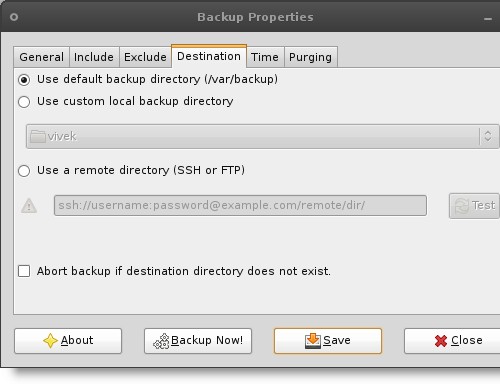
By default SBackup backs up your files to your local machine in /var/backup. You can custom choose the location and backup stuff to another machine using FTP or SSH.
Once you have selected the mode of backup, all you have to do is click Backup Now!. You should see a confirmation dialog.
Scheduling Backup
Scheduling backup is as easy as it can get. Just go to the Time tab and setup when you want to backup.
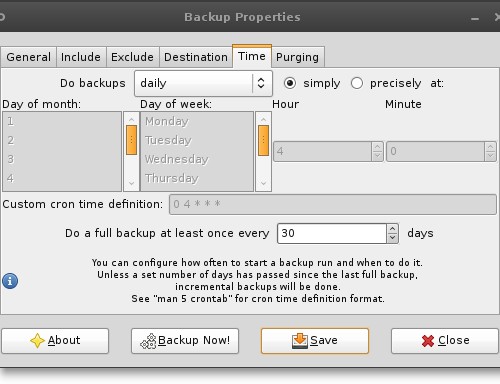
Purging old backups to avoid replication and excessive disk usage can also be setup using the Purge Tab. As I said, in most cases the Use recommended backup settings option is the best.
Restoring the data using SBackup
You can easily restore data from your backup using SBackup restore. You can do a directory-wide restore or just restore the files. To restore the data you’ll have to start the SBackup restore manager, go to System->Administration->Simple Backup restore.
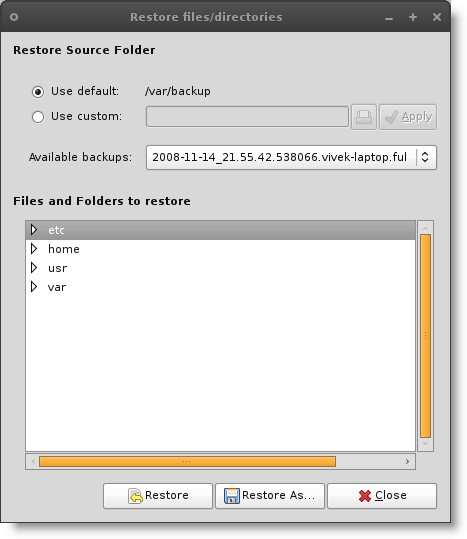
- Click on Available backups.
- Choose the backup from which you want to restore files or directories.
- Select the specific file or directory.
- Click Restore.
You’ll be prompted if you are sure, click Yes and your files/directories will be restored.
I hope this guide will make backing up and restoring on Ubuntu a cake walk.
If you want more tutorials and technology articles like this one, you can subscribe to the TNerd RSS Feed.
SOURCE : TNerd.com


0 comments:
Post a Comment