Darn!, I want to install ubuntu, but, unfortunately I have not an internet connection..:(
Is that you question?!..
Err!, Worry not..here's a simple solution to your question..And all that you require is a "genuine friend" who has a system with Ubuntu + packages installed on it..
Use a computer where they have installed basic utility packages or where they have updated ubuntu. The packages will be in the folder “/var/cache/apt/archives”. Copy it to a removable disc or write them on to a CD/DVD (which ever makes you happy(!))”
Assume that the media name is Pen_Drive
Now, give this command in the terminal of that system which is updated(i.e from the place where you intend to copy the packages.
sudo cp -R /var/cache/apt/archives /media/Pen_Drive
Once the copy process is complete.
Unmount the removable device..and then insert this device in you computer..
and follow it up with these commands on the terminal:
cd /media/Pen_Drive/archives sudo cp -R * /var/cache/apt/archives
Now, if you want to install all the packages that is on your removeable device, then, type this command:
sudo dpkg -i *
However, if you want to install just selected packages, give this command:
sudo apt-get update
Then, go to Synaptic Package Manager and install the packages you want.
Update UBUNTU 8.04 without internet! (!)
Sticky Note as your homepage

Sticky Screen is a simple Post-It note that you can set it as your browser homepage.
ORacle ERRor ORA-27101
This post is for the oracle users....
ORA-27101 : shared memory realm does not exist
Rescue a "crashed linux" without re-installing...
"Whilst attempting to boot Fedora from the NTLoader, I recieve the following "message': "GRUB _" (The underscore represents a blinking cursor thing)...
Is that you QUESTION?!!
If Yes,
Then with the grub cursor flashing it sounds like the system can't find grub you might want to do a reload of Fedora .. But DONT DO THAT!, Fixing is is much easier than what meets the eye..:)
You could actually try duel booting using XP boot manager (My Preference. I don't like third party boot managers.)
Run the command
dd if=/dev/hda5 of=boot.lnx bs=512 count=1
If hda5 is Not your boot partition, change it as appropriate. Type: df then determine which hda# is associated with your /boot partition. A file named boot.lnx should now have been created in the root's home directory or where ever you told it to be. Do an ls -l boot.lnx to confirm this.
Mount your pendrive drive use the command mcopy boot.lnx J: Or if your internet is up and running email it to yourself.
Now reboot and go to Windows XP.
J: Copy boot.lnx C:\ (It will land it in C:\ root.)
Double click your boot.ini file and add one line at the end it should read c:\boot.lnx="Fedora 7".
Then save it.
When you reboot your XP boot manager will come up when you chose Fedora it jumps to the Grub Boot manager on your second drive.
Reboot to Fedora and Enjoy!
Mac OS X Dashboard style on Ubuntu 8.04
KDE 4, Windows, and Mac OS all have some sort of desktop widgets. Your Ubuntu desktop can also, using Screenlets. This post will guide you through installing and using Screenlets on Ubuntu 7.10 and 8.04.
Compiz’s Widget Layer plugin can be used with Screenlets to achieve an effect similar to the dashboard in Mac OS X. Your Screenlets will only be visible by activating a view that dims the desktop and displays the Screenlets on top of everything else.
In the Appearance Preferences dialog (System->Preferences->Appearance), open the Visual Effects tab and switch to the Custom effects level. If this option is not available, you need to install CompizConfig Settings Manager (CCSM) first:
sudo apt-get install compizconfig-settings-manager
Now, open CCSM by clicking the Preferences button. Find the Widget Layer plugin and select the box to turn it on.
For all the Screenlets you want on the Widget Layer, open their right-click menus and select Window->Widget. The Screenlet will disappear from your desktop. Press the default Widget Layer key, F9, to dim the desktop and display your widgets.
Installation
Installing Screenlets
You can keep up-to-date with the latest version of Screenlets by installing it through the repository.
Open your sources.list file to add the repository:
sudo gedit /etc/apt/sources.list
Add this line to the end of the file (for Ubuntu 7.10):
deb http://ppa.launchpad.net/gilir/ubuntu gutsy main universe
Add this line to the end of the file (for Ubuntu 8.04):
deb http://ppa.launchpad.net/gilir/ubuntu hardy main universe
Save and close the text editor. Run this command to update apt:
sudo apt-get update
Install the Screenlets package:
sudo apt-get install screenlets
The package python-feedparser may also be required if it is not already installed:
sudo apt-get install python-feedparser
If starting the Screenlets Manager nags you that Gtkmozembed needs to be installed, some Screenlets may not work. Run this command to fix it:
sudo apt-get install python-gnome2-extras
How to take a System backup in Ubuntu!?

It’s a good idea to ensure that you have a backup and restore system in place. Today we’ll see how in a few very easy steps you can setup system backup and restore in Ubuntu. The good part is that there’s no rocket science involved.
In order to achieve this we are going to need software called SBackup. This is not installed by default in Ubuntu and hence we need to install it. First, let’s see a little bit about this wonderful software.
Homepage: http://sbackup.wiki.sourceforge.net/
Description: SBackup is a simple backup solution for Linux. It is generally developed with a Gnome desktop in mind, but will also work in other desktop environments and also on the console.
Features of SBackup
- Back up using GUI and hence avoid the terminal.
- Restore using the GUI in simple steps.
- You can easily setup automatic backup.
- Custom choose the files to backup.
- Exclude and include files using regular expressions.
- Backup files depending on size and extension.
- You can also use terminal to backup and restore.
Limitations of SBackup
As of now you can only backup data to local or remote machine. Backing up to DVD or CD is not available as of now. However, it’s not difficult to burn a backup to disk yourself manually.
Install SBackup
Install SBackup from the package sbackup (click the link to install), or by running the command below in your terminal:sudo apt-get install sbackup
Launching SBackup
In order to launch SBackup go to System->Administration->Simple Backup Config.
Configuring and setting up backups using SBackup
Once you launch SBackup it’ll open a configuration window for you to configure backup and restore.
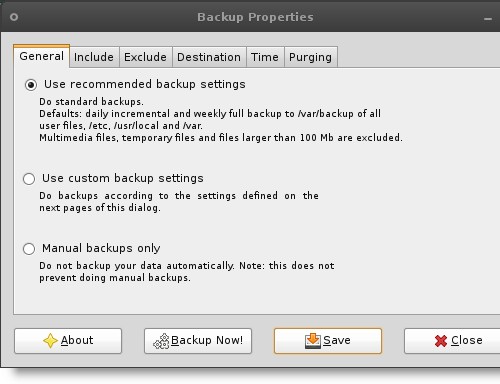
If you notice, there are three options available for setting up the backup and they are self explanatory. I’d suggest Use recommended backup settings for most users.
However, you can also select Use Custom backup Settings and setup your backups based on various criteria like file size, file extension, etc. You can also add and remove folders from the ones which you want to backup and the ones you don’t. All this can be achieved by navigating to the Include and Exclude tabs and changing settings as per your requirements.
You can also change the destination where SBackup will backup your stuff. This can be achieved by going to Destination tab.
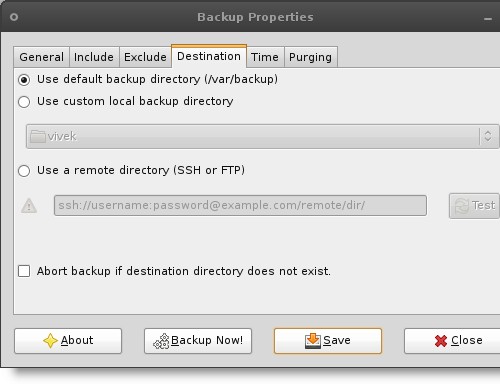
By default SBackup backs up your files to your local machine in /var/backup. You can custom choose the location and backup stuff to another machine using FTP or SSH.
Once you have selected the mode of backup, all you have to do is click Backup Now!. You should see a confirmation dialog.
Scheduling Backup
Scheduling backup is as easy as it can get. Just go to the Time tab and setup when you want to backup.
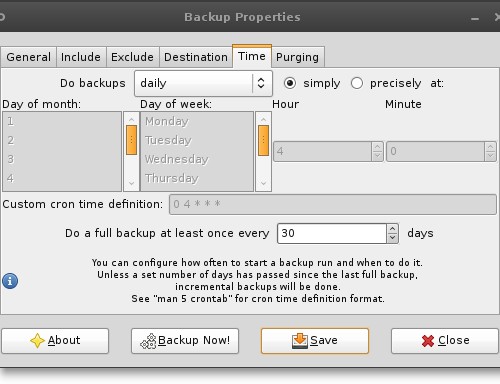
Purging old backups to avoid replication and excessive disk usage can also be setup using the Purge Tab. As I said, in most cases the Use recommended backup settings option is the best.
Restoring the data using SBackup
You can easily restore data from your backup using SBackup restore. You can do a directory-wide restore or just restore the files. To restore the data you’ll have to start the SBackup restore manager, go to System->Administration->Simple Backup restore.
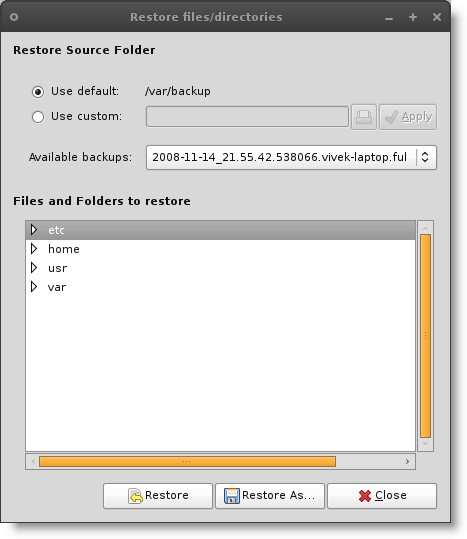
- Click on Available backups.
- Choose the backup from which you want to restore files or directories.
- Select the specific file or directory.
- Click Restore.
You’ll be prompted if you are sure, click Yes and your files/directories will be restored.
I hope this guide will make backing up and restoring on Ubuntu a cake walk.
If you want more tutorials and technology articles like this one, you can subscribe to the TNerd RSS Feed.
SOURCE : TNerd.com
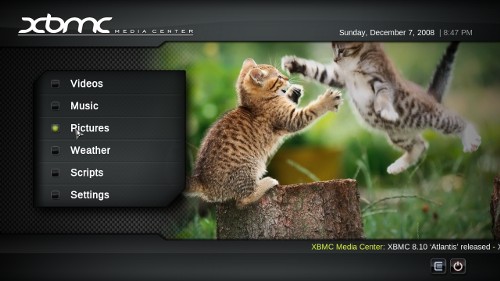
XBMC- Media beyond the ultimatum!
XBMC, recursive acronym for “XBMC Media Center“, is an award winning free and open source software media-player and entertainment hub for all your digital media.
Multi-platform, Internationalized, and Localized
XBMC is a cross-platform software available for Linux, Mac OS X (Leopard, Tiger, and Apple TV), Microsoft Windows operating-system, as well as the original Xbox game-console. With translations to over 30 languages for a worldwide audience. All versions of course completely free of any adware or spyware.
- XBMC for Linux
- XBMC for Mac
- XBMC for Windows
- XBMC for Xbox
- XBMC Live
Community
Over 50 developers have contributed to XBMC, and over 100 translators have worked to expand its reach. XBMC was created by created by a group of like minded back in 2003. XBMC Community Forum today have over 30,000 registered members, nad XBMC had already an estimated userbase of over one million daily end-users when it was only running on the the Xbox platform, and now that XBMC runs nativly on several other platforms as well we estimate that that the userbase have growed exponentionally.
User-friendliness that is Next To Godliness
XBMC is easy to install and setup, and its many beautiful custom user interfaces offers simple very intuitive navigation which are very convenient and flexible, adding to great price verses performance ratio when installed on cheap hardware to this best in class software. With and experience surpases all retail media center systems.
Superb Format and Codec support
XBMC supports a very complete spectrum of of audio and video multimedia file formats and codecs right out-of-the-box, and include features such as playlist playback, audio visualizations, picture viewing, slideshows, and weather forecast functions, RSS feed scroller on your home screen, together with a ever expanding array of community driven third-party add-ons and plugins.
Endless playback capabilities for All Types of Media
XBMC can play most audio and video file formats as well as display images at resolutions up to 1080p and over from virtually any source, including your local harddrive, CD/DVDs, USB flash drives, the Internet, and network shares, upscaling any lower resolutions videos to the maximum of your displays capability. XBMC can also playback DVD-Video movies with menus from ISO/IMG-images on-the-fly, even when they are in an RAR or ZIP archive. For music playback XBMC offers gapless playback, crossfading, cue sheet, replay gain amplification, advanced smart playlists, and chapter support.
XBMC can download or stream Internet video and audio streams, and play Internet radio stations (such as Podcasts and SHOUTcast), and listen to your favorites and discover new music with free, streaming music from Last.fm, among others.
XBMC of course handles all common digital picture formats with the options of panning/zooming, and slideshow with “Ken Burns Effect“. XBMC also handles CBZ and CBR comic book archive files, this feature lets you view/read, browse and zoom the pictures of comics pages these contain without uncompressing them first.
Online Powered Media Management
XBMC has a database driven video and music library view modes which help organize and filter all of your media straight out-of-the-box in. The video library allow you to easily browse your video content by things like; genre, title, year, actors, and directors, as well as carry our extensive searches on casts and related information. Similarly, XBMC’s music library allows the organization of your music collection by information stored in your music file ID meta tags, like title, artist, album, genre and popularity, as well as having access to powerful search and Smart Playlists features, helping you find exactly what you want in a fast and simple way.
Album and Cover Art
XBMC takes full advantage of broadband Internet connection if available, Artwork is automatically fetched for posters, artwork, fanart, synopsis and reviews on movies, plot, cast and episode information for TV shows, also album covers and artist information for music.
Extendable and Flexible Add-ons
XBMC features a Python Scripts Engine and WindowXML application framework (a XML-based widget toolkit for creating a GUI for widgets) in a similar fashion to Apple Mac OS X Dashboard Widgets and Microsoft Gadgets in Windows Sidebar. Python widget scripts allow normal users to add-on ‘extensions’ with new functionality to XBMC themselves, using the easy to learn Python scripting language, without the need for knowledge of any complex programming languages or the inner workings of XBMC. Current plugins and scripts include a multitude of added functions like Internet TV and radio streams, podcasts, movie-trailer browsers, and cinema guides, e-mail clients, instant messaging, train-timetables, peer-to-peer file-sharing downloaders, IRC, also casual games (sometimes also referred to as mini-games or party-games) such as Tetris, Snake, Space Invaders, Sudoku, and much more.
Fully Skinnable and Customizable Interface
XBMC is noted and highly regarded as having a very flexible GUI toolkit and robust framework for its GUI, (now also proven by the fact that several other software projects have copied it). Users can create their own skins, or choose one of the many already available skins. XBMC uses a standard XML base, making theme-skinning and personal customization very accessible to everyone. Users themselves can create their own skin (or simply modify an existing skin) and share it with others via public websites dedicated for XBMC skins trading. Colors, controls, navigation, positioning of elements, animation, even adding additional functionality can be achieved with a skin. “Project Mayhem” is the official skin from Team-XBMC; which is now in its third version, commonly know as “PM3″. Many third-party skins exist and while many are of original and unique designs, a few skins are almost exact replicas of other multimedia software, with skins clones of Apple TV and Front Row, Microsoft Windows Media Center Edition (MCE), MediaPortal, Meedio/MeediOS, HDeeTV, Kaleidescape, Xbox 360, PlayStation 3, and others. Each skin provides a totally different and unique user experience, all showing just how flexible XBMC’s skinning engine really is.
FOSS (Free Open Source Software)
XBMC Media Center software is distributed as open source under the GNU General Public License, (with a few sub-libraries licensed under the LGPL), and as a non-profit project XBMC is run and developed by volunteers in their spare-time without any monetary gain. Team-XBMC encourage anyone to contribute to the project, submit their own source code patches for new features and functions, improve existing ones, or fix any bugs in XBMC that you might find.
Technical Summary
XBMC is written in the C++ program language (and some Assembly code), XBMC uses the SDL (Simple DirectMedia Layer) multimedia framework and OpenGL for graphics rendering the Linux, Mac OS X, and Microsoft Windows based operating-system platforms, and the Xbox version of XBMC uses Microsoft DirectX multimedia framework and Direct3D for graphics rendering, (as the Xbox does not support OpenGL).
Installation
Open System->Administration->Software Sources and select the Third Party Software tab. Add the following software source:deb http://ppa.launchpad.net/team-xbmc-intrepid/ubuntu intrepid main
Close Software Sources and when prompted, choose to reload the repositories.
Install XBMC from the package xbmc (click the link to install), or by running the command below in your terminal:sudo apt-get install xbmc
Optionally you can also install:
- additional skins
sudo apt-get install xbmc-skin-* - support for remote controls
sudo apt-get install xbmc-eventclients-* - a scripting example
sudo apt-get install xbmc-scripts-example
Starting and Running XBMC
All that is left now is to start XBMC. You can start XMBC by going to Applications->Sounds & Video->XBMC Media Center.
Compiz Earth
Compiz 0.7.6 comes with new plugins that allow you do quite a lot. The best of the lot is getting the earth out of your desktop.
Check the video below--
"Awesome!" would perhaps be just an euphemism!
Click here to view the video
To install Compiz 0.7.6 just add the following repository
deb http://ppa.launchpad.net/compiz/ubuntu hardy main
The Worlds First SuperComputer PC
The world's first personal supercomputer, which is 250 times faster than the average PC, has been unveiled on dec 6 2008 . With its £4,000- £8,000 price tag, the Tesla supercomputer is beyond the reach of most consumers, but is expected to revolutionise the way scientists and medical professionals carry out their work.
Until now, supercomputers were massive systems made up of thousands of machines taking up entire rooms, which cost millions of pounds to build and maintain.By contrast, Tesla personal supercomputers will cost between £4,000 and £8,000 and look much like an ordinary PC
David Kirk, chief scientist at NVIDIA, the American company which has designed the new technology, said: "Pretty much anything that you do on your PC that takes a lot of time can be accelerated with this.""These supercomputers can improve the time it takes to process information by 1,000 times."
The new computers make innovative use of graphics processing units - a technological breakthrough, which the company claims could bring lightning speeds to the next generation of home computers.They went on sale to British customers yesterday and will initially be sold to universities and to the scientific and research community.
The PC maker Dell, however, said that it would soon be mass producing them for the general consumer market.


